Home DIY Recap | Refinishing & painting our old farmhouse style table for under $70
Hey, everyone! Today I am back with a
very long, picture-filled post! During our week vacation back in May, we (meaning me)
decided to tackle refinishing, staining, and painting our old hand-me-down
farmhouse style table and chairs.
In this post I'm going to go into detail
about my experience with this project, but if you're just looking for a quick
how-to, a materials list, and maybe some tips, scroll to the bottom.
I tried my best to document the whole process, including products and
techniques used. I hope this helps anyone looking to update their old table!
______________________________________________________________
I can't believe I forgot to do this, but
I didn't take a "before" picture. Luckily, even though our table is
over 15 years old, Wal-Mart still sells it. I found a picture with the exact
chairs and bench we purchased a few years ago to complete the set as well. We
love our table and it is very sturdy, but it had so many scratches and areas
where the varnish wore off, and the stain color in my opinion made it look
outdated.
 |
[Side note: here's a fun drinking game... take a shot every time you read the word "sand" in this post. You'll get tipsy real quick... sorry, folks!]
D A Y // O N E
We set up shop on our back patio area. We removed the legs from the tabletop, propped it on 2 sawhorses. The first task was to sand down the tabletop. I used a Makita electric sander with a 60 grit sandpaper to remove the varnish, down to the bare wood. Then, I used a 120 grit to further smooth out the wood. I occasionally stopped to brush the sawdust from the table and to ensure that the sandpaper wasn't too clogged with the old stain, which I removed with a putty knife we had laying around the garage.


 |
| Midway through step 1! This was just a rough sand. You can get a good view of some of the damage on the table. |
 |
Almost done with the first sanding session.
After my initial sanding, my hubby came to the rescue with a final, ultra-fine sand using a 220 grit.
Random side note: all these years later and I still have major crush on this guy. 😍 😍 😍 😍 😍

After sanding the top down, I started hand sanding the edges of the table with 120 grit sandpaper. The end result was a very light, super smooth table all prepped for stain and varnish.

Then, it was time to hand sand the legs with a 220 grit. This task was super tedious, due to the detail and curved edges of the legs. In the picture below, you can see the difference between a sanded down leg (bottom) and the not yet sanded leg (top). You want to make sure there is no "shiny" varnish on the wood by the time you're finished.
|

D A Y // T W O
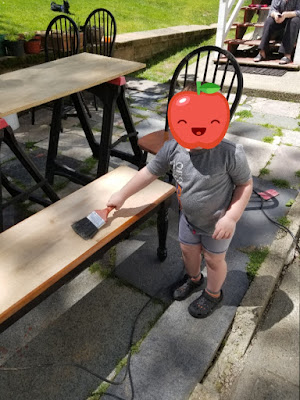
Day 2 was another sanding day, this time working on the chairs and the bench. I sanded down the bench top first with my electric sander and 120 grit. I had a little helper as my dust brusher (my godson, Nigel).

I repeated the steps I did while sanding down the table, working my way through the top with the Makita sander and the edges, sides, and the legs by hand.
Then, it was time to work on the chairs. [I forgot to take photos of this step, so sorry!] I sanded down the seats of the chairs with my electric sander, using a 120 grit. At first, I used an electric precision sander (like this one) to try to get in between the poles on the backs of the chairs, but it was really difficult to get a precise, fine sand in such an awkward, curved area. My husband ended up removing the chair backs so I could finish the seats with the larger electric sander. That was MUCH easier. Once the seats were smooth with a rough sand [with 120 grit] and a final sand [with 220 grit], we moved on to legs and backs of the chairs, sanding them by hand with a 220 grit (or a scuff pad), until the previous paint was completely dull.
We ended the day there, with the chairs completely taken apart and sanded.
D A Y // T H R E E
Day 3 was about painting. We hung up the legs and backs of the chairs using wire on the clothesline out back. Then, we taped up the chairs so that we could paint the legs without painting the seats (which we were going go stain/varnish), and got to painting.


For paint, we used Rust-oleum Painter’s Touch 2x Cover in Blossom White. It is a primer-and-paint-in-one product and the finish of it is beautiful, but be prepared to spray on a lot of coats. We did about 4-5 coats on the legs and backs of the chairs. For future projects, I think we'll try to use a separate primer and paint for better color payoff per coat. We also ended up picking up one of these handle grips for the spray paint cans. It made the job much less painful and easier overall.


D A Y // F O U R
In the morning, my husband added a final coat to the legs and backs of the chairs and painted the sides of the table.
Once everything was dry, we brought the table and chair seats into the house to stain and varnish them. To stain, we used clean rags we had laying around the house and dipped them in the stain, spreading on thin layers and using a secondary clean rag to wipe away excess stain. When doing this step, make sure you're going with the wood grain and that you're staining in sections, wiping away excess in between. In case you're overwhelmed: don't be! This step is actually really easy- and fast! Just make sure to let the stain dry in between coats (ours had a 4 hour drying time) if you choose to continue adding more.
We did 3 coats of stain. The stain color was so beautiful!!! The table and chairs then had to dry for 8 hours before applying the polyurethane.

D A Y // F I V E
We varnished the tabletop, bench top, and chair seats. To varnish, make sure you apply an even coat, going with the grain of the wood. Air out the house, too, if you’re doing this inside. We left our windows and slider deck door open. Read the instructions on the back of the can for guidance on how long to wait in between coats. Our can said we needed to wait 4 hours, and if after that time the surfaces were still tacky, we were to leave it until it was completely dry. We did 2 coats of semi-gloss polyurethane. We left the polyurethane to dry for 12 hours over night.
 |
| Midway through drying |
D A Y // S I X
We did a very light sanding with 220 grit and applied the third and final coat of polyurethane. After that, we left everything to cure for about 3-4 days before we reassembled the table and chairs.
F I N A L // T H O U G H T S
It was definitely interesting living without a table and chairs for about a week, but it was worth making sure the varnish hardened and paint cured enough so that in the future, it won't have marks or chip easily.
I will be honest, this might have been a bit ambitious for my first DIY project. Silver lining? I now know how to refinish furniture, and feel confident to tackle my next few projects on my own.
Refinishing our table was a lot of work, but we love how it turned out and don't regret tackling it. Here are the "after" pictures:


______________________________________________________________
For this project, you will need:
1. Sandpaper [we used 60 grit, 120 grit, & 220 grit] and a scuff pad [not a necessity, but it was handy to dull paint on the rounder areas]
2. An electric sander [we used this Makita one]
3. Spray paint [we used about 12 cans of Rust-oleum Painter's Touch 2x Cover (5 coats on everything) in Blossom White/ Satin finish]
4. Spray paint nozzle grip [not a necessity per say, but it will make the job easier!]
5. Stain [we chose Varathane wood stain in Special Walnut]
6. Varnish [we used Varathane Clear Semi-Gloss Oil-Based Polyurethane]
7. Tack cloths
8. Paint brush [to brush away excess dust]
9. Putty knife [to scrape away built-up stain on the sandpaper pad]
Logistics:
Total time it took to complete this project: 20-25 hours, spread out across 6 days
Total cost of the project, not including power tools or sand paper: ~$65.00
We ended up using our electric sander, precision sander, and sand paper that we already had in the garage, 12 cans of spray paint (~$46.00), a quarter of a can of stain (~$8.00), and a can of polyurethane ($11). [You could probably get the cost lower by purchasing a smaller can of stain. We purchased a quart size just to be safe, but I will just use those for future projects.]
How-to:
1. Prep for sanding. Remove legs from the table and chairs/ backs of chairs. Prop the tabletop on 2 sawhorses.
2. Sand the flat surfaces to the bare wood to prep for stain/ varnish. Use an electrical sander to do this. We used 60 grit to remove the old varnish, 120 grit to prepare the wood, & 220 grit to do a final sand. Make sure your surfaces are super smooth. Stop occasionally to brush away sawdust and scrape away any built-up varnish/stain on the sandpaper pad. Take your time with this step!
3. Sand the sides/ any curved edges and legs. Hand sand the legs/ any curved edges. We used 120 grit to prepare the wood & 220 grit to do a final sand. For areas that you are painting over, you don't need to sand down to bare wood- just make sure you dull out the paint (you don't want to have any shiny areas left). You can also use a scuff pad for this step.
4. Prep for paint. Hang up legs/ backs of the chairs. Alternatively, you can set them up by propping them on plastic cups.
5. Paint. If you choose to use the Rust-oleum spray paint, do 4-5 even coats by spraying quickly in up and down/ side-to-side strokes. Allow paint to dry in between coats. Too-heavy coats of paint will cause runs in your finish. Make sure the paint is completely dry before starting to stain.
6. Stain. Dip a rag in the stain, spreading thin layers onto the surface and using a clean rag to wipe away excess stain (don't let the stain dry before wiping away the excess!). Apply stain with the wood grain, and stain in sections. Make sure you read the instructions on the back of the can! It will tell you specifically how long to wait in between coats and the varnish.
7. Varnish. Apply even coats going with the grain of the wood. Make sure you air out the house, too, if you're doing this inside. Read the instructions on the back of the can for guidance on how long to wait in between coats.
8. Let everything dry/cure. Don't put the furniture together for daily use until everything is fully cured. Wait at least 3 days for heavy use. You can also refer to the instructions on the back of the polyurethane stain for further guidance.
______________________________________________________________
Tips from my handyman husband:
1. The better the prep work, the better the finish. Take your time with it, and don't cut corners.
2. When sanding, go with the wood grain- don't sand across it. Also, don't spend too much time going over the same spot- that will make grooves in the wood. You want to keep moving constantly when sanding, which will make the surface more even.
3. When purchasing sandpaper, remember this: the lower the grit number is, the rougher the sand paper. 60 grit is much rougher than 120 grit, while 220 grit is a very fine sand.
4. There's no one size fits all for sand paper. The grit you use depends on the original finish of your project- if you start off with 60 but it's not working out, decrease the roughness to the next grit.
5. If you are sanding to stain, make sure to sand to bare wood. If you are sanding over old paint to repaint, you have to make the areas dull so that primer/ paint can adhere to the wood.
6. When you get to a good finish, clean up the area with a resin cloth before painting/ varnishing. This is a very important step! It makes a huge difference in the finish (see tip #1).
7. Always use primer (some products have paint and primer in one, which can save you tons of time). Sand the primer after it is applied with a finer grit sand paper, like a 220- it will smooth out the surface to prep for paint.
8. Spray paint results in a more natural, smooth finish as opposed to painting with a brush. We used Rust-oleum Painter's Touch 2x Extra Cover (he was really impressed with the coverage from this product- and coming from a former painter, that's a really good recommendation- but like I said before, be prepared to put on several coats if you're looking for full coverage).
9. Make sure you give the paint enough time to cure before bringing the item back into your home for daily use.
10. If you go heavy with spray paint, you will make runs in the finish. To make an even coat with spray paint, do a very light first layer. Let the paint dry in between layers. Keep layering light coats until you are satisfied with the finish.
11. Something to think about, that we didn't do but in the future will consider: if you are painting over dark colors (i.e., green and black like we did), use a gray primer, sand it with a fine 220 grit, then start painting. That will decrease the amount of coats you need to apply to cover the previous dark color.
12. When varnishing, make sure you are in a dry, non-humid, non-windy environment.
______________________________________________________________
Tips from a novice DIY-er:
1. Do you research before jumping into a project. Thankfully I had my husband to help, but make sure you have some good knowledge of what you're doing before diving in.
2. Set aside more time than you think you will need. Something will happen to make the project take a bit longer than you thought it would.
3. Take your time! It's better to suffer through the tedious parts of a project than it is to hate how the item wears a year down the line.
4. Wear old clothes- and comfortable shoes. This may sound simple but just trust me!
5. If you don't have an extensive tool collection like my handy husband, Home Depot actually has a rental program! I've never had to use it, but it might be worth looking into. That way it will save you from having to buy the tools, unless you are planning to become a frequent DIY-er.
6. This one was kind of surprising: you're going to feel like you got hit by a bus after sanding so much! Take some Aleve/ Ibuprofin and find some time to relax your sore muscles in the bath with some epsom salts.
7. I'm such a perfectionist that I panicked midway through the project so many freaking times- about the paint color, stain, finish, everything. My advice to you? RELAX. Enjoy the process of refinishing your piece. I'm sure you will love it and it will all be worth it once it's done. Don't judge the project before it's completely finished!
8. Probably the most important product of all... Don't forget sunscreen! I got so burned from days 1 & 2.

______________________________________________________________
And that's it for this post! I know it's super long and wordy, but I wanted to make sure it was detailed enough to help anyone looking to refinish and give new life to their old kitchen table! If you have any other helpful tips or tricks, I'd love to hear them! Leave them down in the comments below.

Looks awesome, love! I envy your patience. This is why my kitchen cabinets still look like crap. 😂
ReplyDelete